
1.2. Hello World (2026)
In this tutorial, you will create and run the Hello World program of embedded systems which is unsurprisingly : a blinking LED!
Start STM32CubeIDE within your dedicated workspace (workspace_tuto).
1. Creating a new project
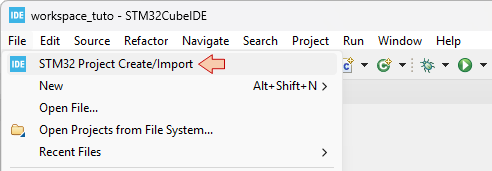
Let us start with a new project STM32CubeIDE empty project. This is achieved by selecting from the main menu: File→STM32 Project Create/Import.
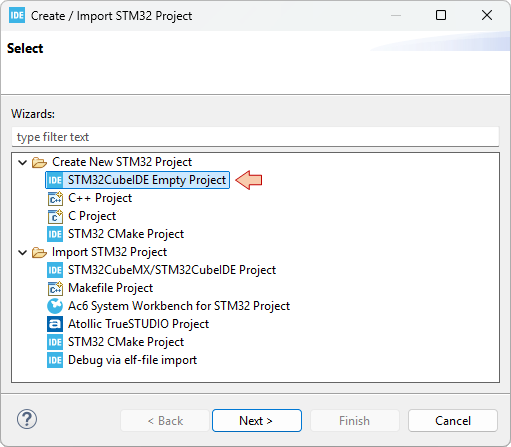
In the Create / Import STM32 Project dialog, select STM32CubeIDE Empty Project.
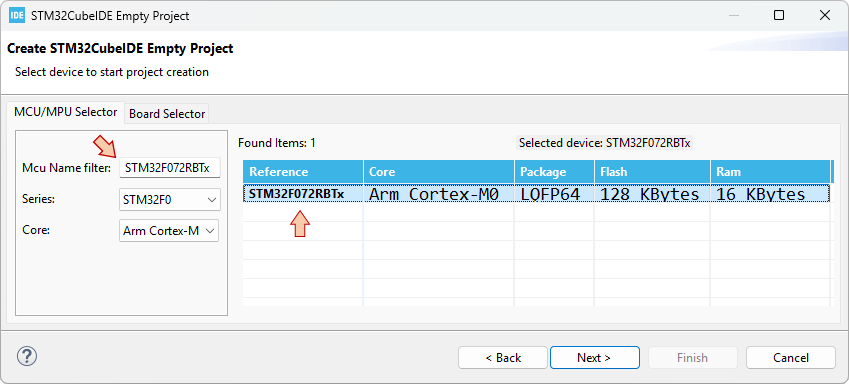
In the STM32CubeIDE Empty Project dialog, select the MCU you are working with. The Nucleo board that is used all along these tutorials features a STM32F072RBT6 MCU. You'll find it by typing "STM32F072RBTx" in the Mcu Name Filter field. Select the device in the table. Before moving further, it is worth noting that:
The FLASH memory is the non-volatile memory where your program is stored. Its size (128kB) limits the amount of code you can fit into this MCU (i.e. how "big" is your program).
The RAM memory is the volatile memory where program variables live. Its size (16kB) therefore limits the amount of variables your can declare in your program (up to 16000 char, or 4000 int for instance). It is not a lot.
Click Next.
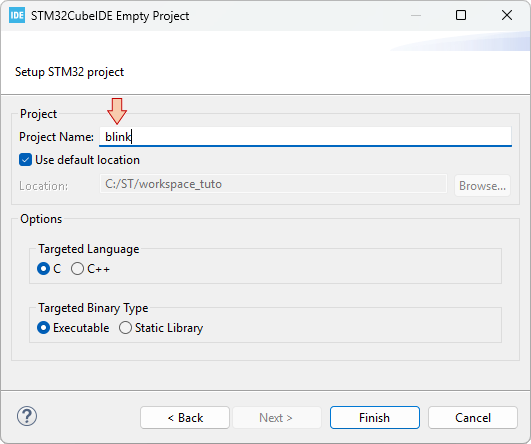
Finally, provide a name for the project "blink", and then click Finish.
An empty "blink" project is created and added to your workspace. Let us review the folders and files that we have:
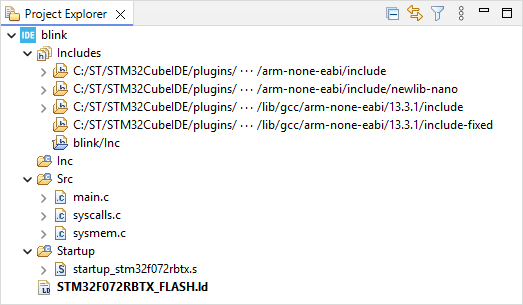
The Includes branch shows all the paths to folders that contains headers (*.h) you might want to include. It concerns gcc standard libraries, and the project header folders. Here we only have one such project folder (blink/Inc), which is by the way empty.
The Inc (for now empty) folder is the suggested place for your application headers (such as a possible main.h for instance).
The Src folder is the suggested place for your application source code (*.c). This is where we find the main.c file that implements the main() function. The two other files (syscalls.c and sysmem.c) are optional, and could be removed by tuning project settings. We'll leave that for later.
The Startup folder contains a single assembly source file startup_stm32f072rbtx.s. That is the piece of code, written by ST, that is executed first, when the MCU gets powered (bootloader). It is a very important code that is in charge of (i) initializing your project variables, (ii) defining the Interrupt Vector Table, and (iii) calling the main() function. For now, the only two things you need to know about this file are :
Any STM32 project must have such a startup code, written for the specific MCU that you are working with.
Do not edit this file.
And finally, something called the LinkerScript: STM32F072RBTX_FLASH.ld. STM32 MCUs have a 32-bit wide address bus. This means that "in theory", up to 232 = 4Gb memory locations are available. As seen earlier, the total amount of memory the device actually features is much less than that. Although there are additional locations such as MCU and peripheral registers to address the total amount of "real" locations is way below 4 Billions. The LinkerScript is the file written by ST that describes the memory layout and in particular, that specifies the address ranges for both the Flash and the Ram memory. It works together with the startup code. For now, what you need to know about that LinkerScript is the same as for the startup code:
Any STM32 project must have such a LinkerScript, written for the specific MCU you are working with, and coming together with the startup code.
Do not edit this file.
2. Edit the main() function
Double-Click the main.c file and locate the implementation of the main() function:
int main(void)
{
    /* Loop forever */
	for(;;);
}
As you can see, the main() function does nothing, looping forever in an empty loop. Note that:
for(;;);Is equivalent to:
while(1);As a matter of fact, it is mandatory for a MCU program that the main() function never returns. So, one way or another, the program is always running within a infinite loop. If you're curious to know what happens if you (accidentally) return from the main() function, take a look in the startup code, right after the call to the main() function. You'll see another forever loop, which is only there as an additional safety net:
/* Call the application's entry point.*/
  bl main

LoopForever:
  b LoopForever
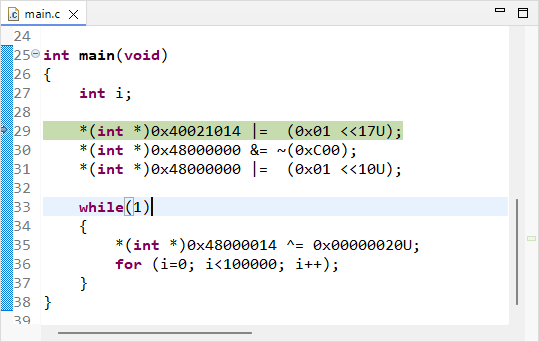
Now, replace the code of the main() function with this one:
int main(void)
{
    int i;

    *(int *)0x40021014 |=  (0x01 <<17U);
    *(int *)0x48000000 &= ~(0xC00);
    *(int *)0x48000000 |=  (0x01 <<10U);

    while(1)
    {
    	*(int *)0x48000014 ^= 0x00000020U;
    	for (i=0; i<100000; i++);
    }
}
It is likely that you don't understand what you've just pasted. Do not worry:
That will be demystified in the next tutorial.
We're not going to keep coding that way for long.
Save all files ![]() .
.
2. Review the Build Settings
At this moment, the project is ready for building. Yet, before we hit the hammer, let us review the project properties to make sure that everything is in place. There are few windows presented next, that you really need to meet (and understand) for future reference.
Right-Click on the ![]() folder and select Properties (or use the top menu Project → Properties, or hit Alt + Enter).
folder and select Properties (or use the top menu Project → Properties, or hit Alt + Enter).
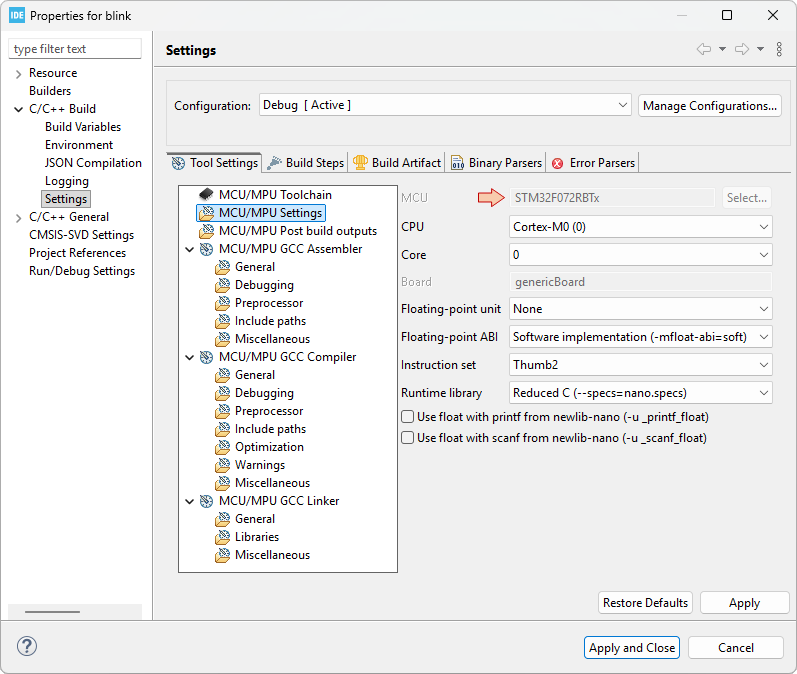
In the left tree view, unfold the C/C++ Build category, and then select the Settings subcategory. In the Settings options, select the Tool Settings tab, and then the MCU Settings folder.
Review the MCU/MPU Settings. If for any reason your target is not there (STM32F072RBTx), you may click the Select... button from the MCU field to pick-up your target part number.
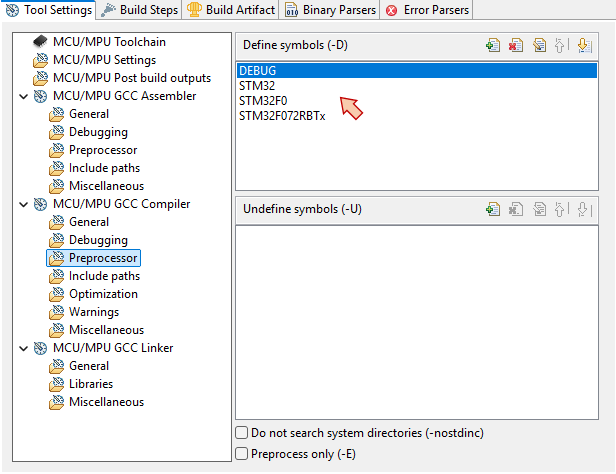
Then, review the Preprocessor page in the MCU/MPU GCC Compiler category. The list in the Define symbols field is used to control source code compilation based on #ifdef, #ifndef, #endif preprocessor directives. Having a symbol defined here is equivalent to write a #define within the source code, but it provides a way to do it without editing generic (library) source files, which is usually a better option. Note that the symbols we have for now (DEBUG, STM32, STM32F0, STM32F072RBTx) are there for future use together with ST libraries that are not included in the project yet. Leave it as it is, but you could remove them all without any issue.
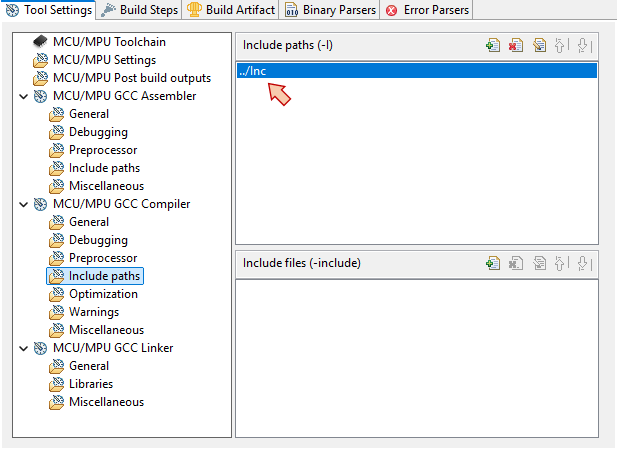
Next, review the Include paths in the same MCU/MPU GCC Compiler category. This is where you can manage the paths to your various headers. It is very important to understand that "just" having a header folder within a project does not tell the builder that it can use it. The folder has to be listed here.
For now, we just have the path to the Inc folder (relative to the Src folder). Again, leave it as it is, but as long as Inc folder is empty, there is no problem removing this entry.
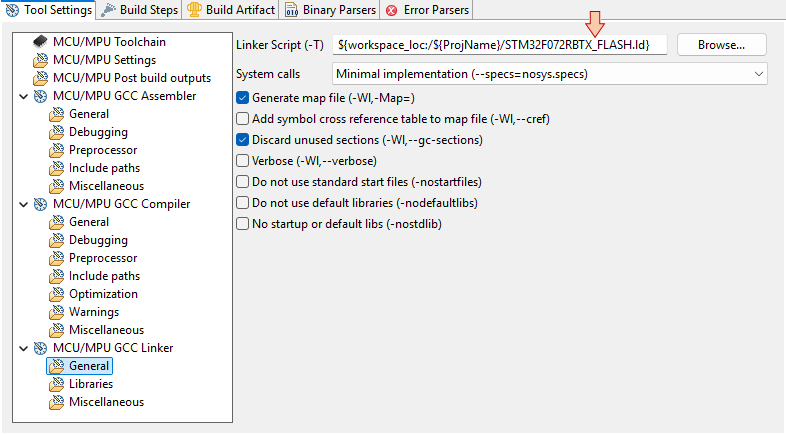
Finally, review the linker options. Still in the Settings subcategory, select MCU/MPU GCC Linker \ General folder and review the Linker Script field. This is where you tell the Linker what LinkerScript to use. If this field is empty, or wrong, you can click the Browse... button and navigate to your LinkerScript file. Wrong path is common when you move project from a computer to another, so you should get used coming here.
When your done, you can Apply and Close the whole project properties.
3. Build the Project
Hit the build ![]() button, and the project should compile without any error. Make sure you read the build report:
button, and the project should compile without any error. Make sure you read the build report:
17:02:36 **** Build of configuration Debug for project blink ****
make -j22 all
arm-none-eabi-gcc -mcpu=cortex-m0 -g3 -DDEBUG -c -x assembler-with-cpp -MMD -MP -MF"Startup/startup_stm32f072rbtx.d" -MT"Startup/startup_stm32f072rbtx.o" --specs=nano.specs -mfloat-abi=soft -mthumb -o "Startup/startup_stm32f072rbtx.o" "../Startup/startup_stm32f072rbtx.s"
arm-none-eabi-gcc "../Src/main.c" -mcpu=cortex-m0 -std=gnu11 -g3 -c -I../Inc -O0 -ffunction-sections -fdata-sections -Wall -fstack-usage -fcyclomatic-complexity -MMD -MP -MF"Src/main.d" -MT"Src/main.o" --specs=nano.specs -mfloat-abi=soft -mthumb -o "Src/main.o"
arm-none-eabi-gcc "../Src/syscalls.c" -mcpu=cortex-m0 -std=gnu11 -g3 -c -I../Inc -O0 -ffunction-sections -fdata-sections -Wall -fstack-usage -fcyclomatic-complexity -MMD -MP -MF"Src/syscalls.d" -MT"Src/syscalls.o" --specs=nano.specs -mfloat-abi=soft -mthumb -o "Src/syscalls.o"
arm-none-eabi-gcc "../Src/sysmem.c" -mcpu=cortex-m0 -std=gnu11 -g3 -c -I../Inc -O0 -ffunction-sections -fdata-sections -Wall -fstack-usage -fcyclomatic-complexity -MMD -MP -MF"Src/sysmem.d" -MT"Src/sysmem.o" --specs=nano.specs -mfloat-abi=soft -mthumb -o "Src/sysmem.o"
arm-none-eabi-gcc -o "blink.elf" @"objects.list"   -mcpu=cortex-m0 -T"C:\ST\workspace_tuto\blink\STM32F072RBTX_FLASH.ld" --specs=nosys.specs -Wl,-Map="blink.map" -Wl,--gc-sections -static --specs=nano.specs -mfloat-abi=soft -mthumb -Wl,--start-group -lc -lm -Wl,--end-group
Finished building target: blink.elf

arm-none-eabi-size  blink.elf
arm-none-eabi-objdump -h -S blink.elf  > "blink.list"
   text	   data	    bss	    dec	    hex	filename
    560	      0	   1568	   2128	    850	blink.elf
Finished building: default.size.stdout

Finished building: blink.list
17:02:37 Build Finished. 0 errors, 0 warnings. (took 385ms)
There should be no errors or warnings. Note that project structure has been populated with new items:
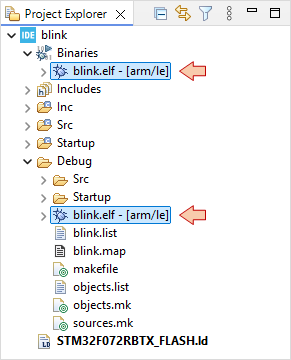
A Binaries section
A Debug folder
Both contain the blink.elf "executable" file. This .elf file is what you need to run of debug the program onto the Nucleo board:
4. Configure the debug session
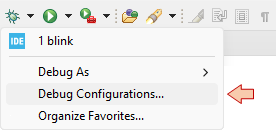
In the main toolbar, click the dropdown arrow besides the debug button ![]() and select Debug Configurations...:
and select Debug Configurations...:
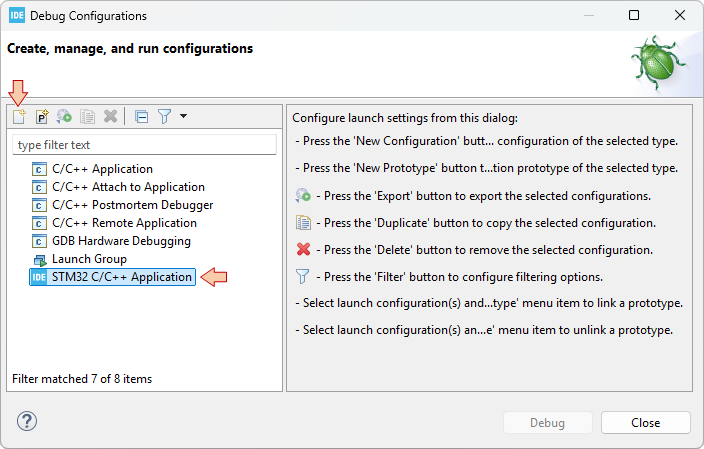
In the Debug Configuration dialog, select STM32 C/C++ Application, and then the New launch configuration button ![]() :
:
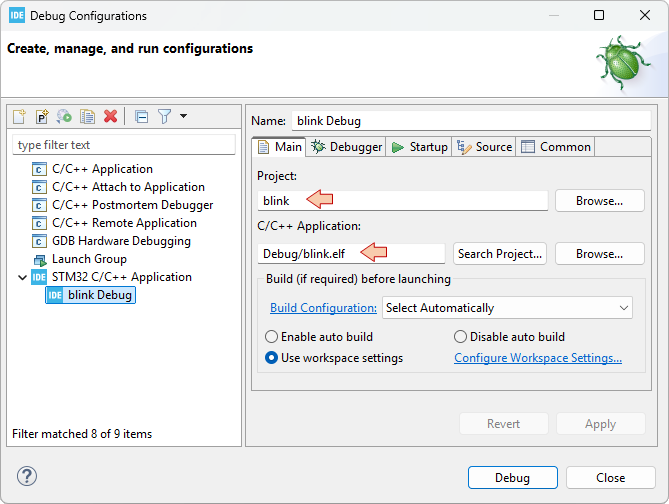
Make sure the new configuration has been created and review parameters in the Main tab:
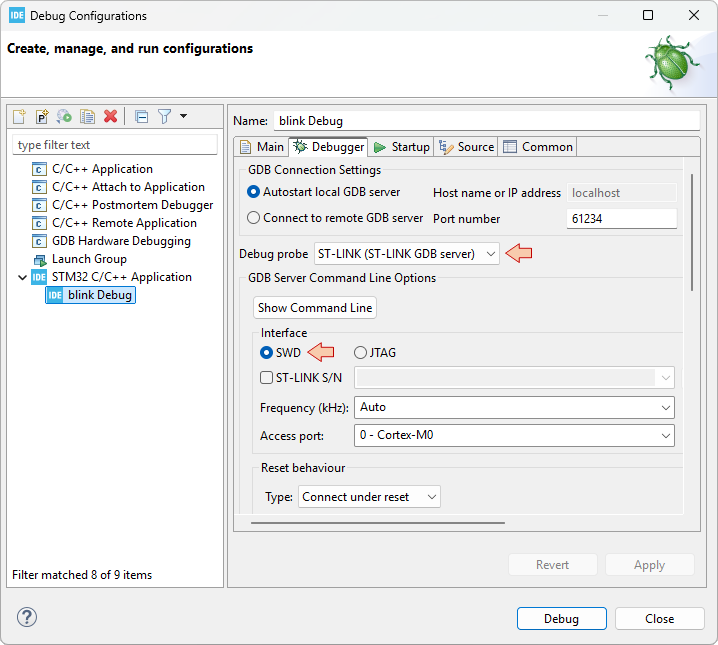
Then move to the Debugger tab and make sure that Debug probe is ST-LINK with SWD Interface:
When you've made sure that everything is set, then you can just close the Debug Configurations dialog.
Now, you can either just run ![]() the application on the target, or enter a debug
the application on the target, or enter a debug ![]() session.
session.
5. Run the application
Make sure your Nucleo board is connected, then click the Run button ![]() and watch the STM32CubeIDE console. As you can see, the whole process includes:
and watch the STM32CubeIDE console. As you can see, the whole process includes:
Stating a debug session (gdb).
Downloading (flashing) the program into the target MCU by calling STM32CubeProgrammer.
Closing the debug session.
STMicroelectronics ST-LINK GDB server. Version 7.12.0
Copyright (c) 2025, STMicroelectronics. All rights reserved.

Starting server with the following options:
        Persistent Mode            : Disabled
        Logging Level              : 1
        Listen Port Number         : 61234
        Status Refresh Delay       : 15s
        Verbose Mode               : Disabled
        SWD Debug                  : Enabled
        InitWhile                  : Enabled

Waiting for debugger connection...
Debugger connected
Waiting for debugger connection...
Debugger connected
Waiting for debugger connection...
      -------------------------------------------------------------------
                       STM32CubeProgrammer v2.21.0
      -------------------------------------------------------------------
Log output file:   C:\Users\Laurent\AppData\Local\Temp\STM32CubeProgrammer_a13884.log
ST-LINK SN  : 066DFF544949878667153519
ST-LINK FW  : V2J46M32
Board       : NUCLEO-F072RB
Voltage     : 3.25V
SWD freq    : 4000 KHz
Connect mode: Under Reset
Reset mode  : Hardware reset
Device ID   : 0x448
Revision ID : Rev Z
Device name : STM32F07x
Flash size  : 128 KBytes
Device type : MCU
Device CPU  : Cortex-M0
BL Version  : 0xA1

Opening and parsing file: ST-LINK_GDB_server_a13884.srec

Memory Programming ...
  File          : ST-LINK_GDB_server_a13884.srec
  Size          : 560.00 B
  Address       : 0x08000000

Erasing memory corresponding to segment 0:
Erasing internal memory sector 0
Download in Progress:

File download complete
Time elapsed during download operation: 00:00:00.120

Verifying...
Time elapsed during verifying operation: 00:00:00.003

Download verified successfully

Shutting down...
Exit.
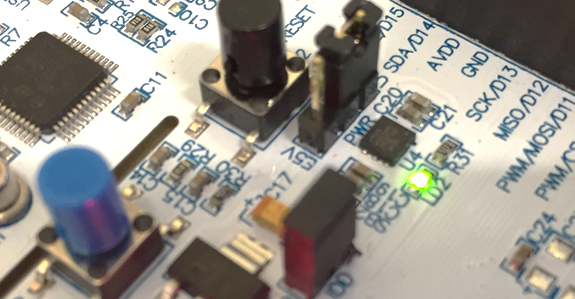
Watch the Nucleo board, you should get the LED blinking:
6. Debug the application
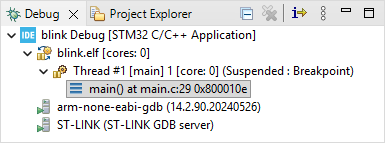
Click the ![]() debug button and watch the console to make sure there's no reported problems. After a little while you should enter the debugger session:
debug button and watch the console to make sure there's no reported problems. After a little while you should enter the debugger session:
From there, you can control program execution using usual toolbar commands (![]() ,
, ![]() ,
, ![]() ,
, ![]() ,
, ![]() ,
, ![]() , ...).Run the program full-speed by clicking the Resume button
, ...).Run the program full-speed by clicking the Resume button ![]() . You should get the blinking LED as expected.
. You should get the blinking LED as expected.
Note that a debug session runs few processes in the background of your computer. These processes are listed in the Debug frame and include:
The gdb debugger itself, from the MCU ARM GCC toolchain
The ST-Link gdb server for specific access to the Nucleo hardware
When you're done debugging, that very important that you leave the debugger clean, and these process should terminate automatically. Suspend the debugger ![]() and terminate
and terminate ![]() the debug session and switch back to C/C++ perspective.
the debug session and switch back to C/C++ perspective.
7. Summary
Congratulations, you've got your first STM32 program running.
You've done much more than you think:
You've got all the tools installed.
You've created a project that compiles.
You've configured the build
You've configured the run/debug session